Tutorial: Build your first custom node
This tutorial builds one custom node end to end, entirely in the Node Designer — the visual tool for making your own nodes. No file to write by hand, no terminal: you lay out the settings form, write one small transform, test it, and save. The node then appears in the palette next to the built-in ones.
The example is an Emoji Generator that maps a numeric column to mood-based emojis. It is small, and it exercises everything real nodes use: a multi-section settings form, a type-filtered column picker, and a process method that transforms the incoming data.
What you'll build
An "Emoji Generator" node that:
- Maps a numeric column to mood-based emojis.
- Offers seven emoji themes (performance, temperature, money, and so on).
- Includes intensity controls and an optional random sparkle.
- Has a two-section settings form.
Prefer working in code? The same node as a file is at the end — the two paths round-trip.
Open the Node Designer
Open Settings → Extensions → Node Designer in the sidebar and click New. You'll build the node in three tabs — Form (the settings your node's users see), Code (the transform), and Test (run it against sample data) — with a Node Settings panel on the left for its name, category, and icon.
1. Name it
In the left Node Settings panel, under Identity:
- Node Name →
Emoji Generator - Category →
Fun Stuff(type it — this becomes a Fun Stuff group in the palette; the defaultCustomwould land it under User Defined Operations) - Node Icon → pick anything you like.
Leave Execution on Local (Polars) — this node uses only Polars and the standard library, so it needs no kernel and no Docker. (You'd switch to a kernel only for a node that needs a third-party library — see K-Means on a Kernel.)
2. Build the form
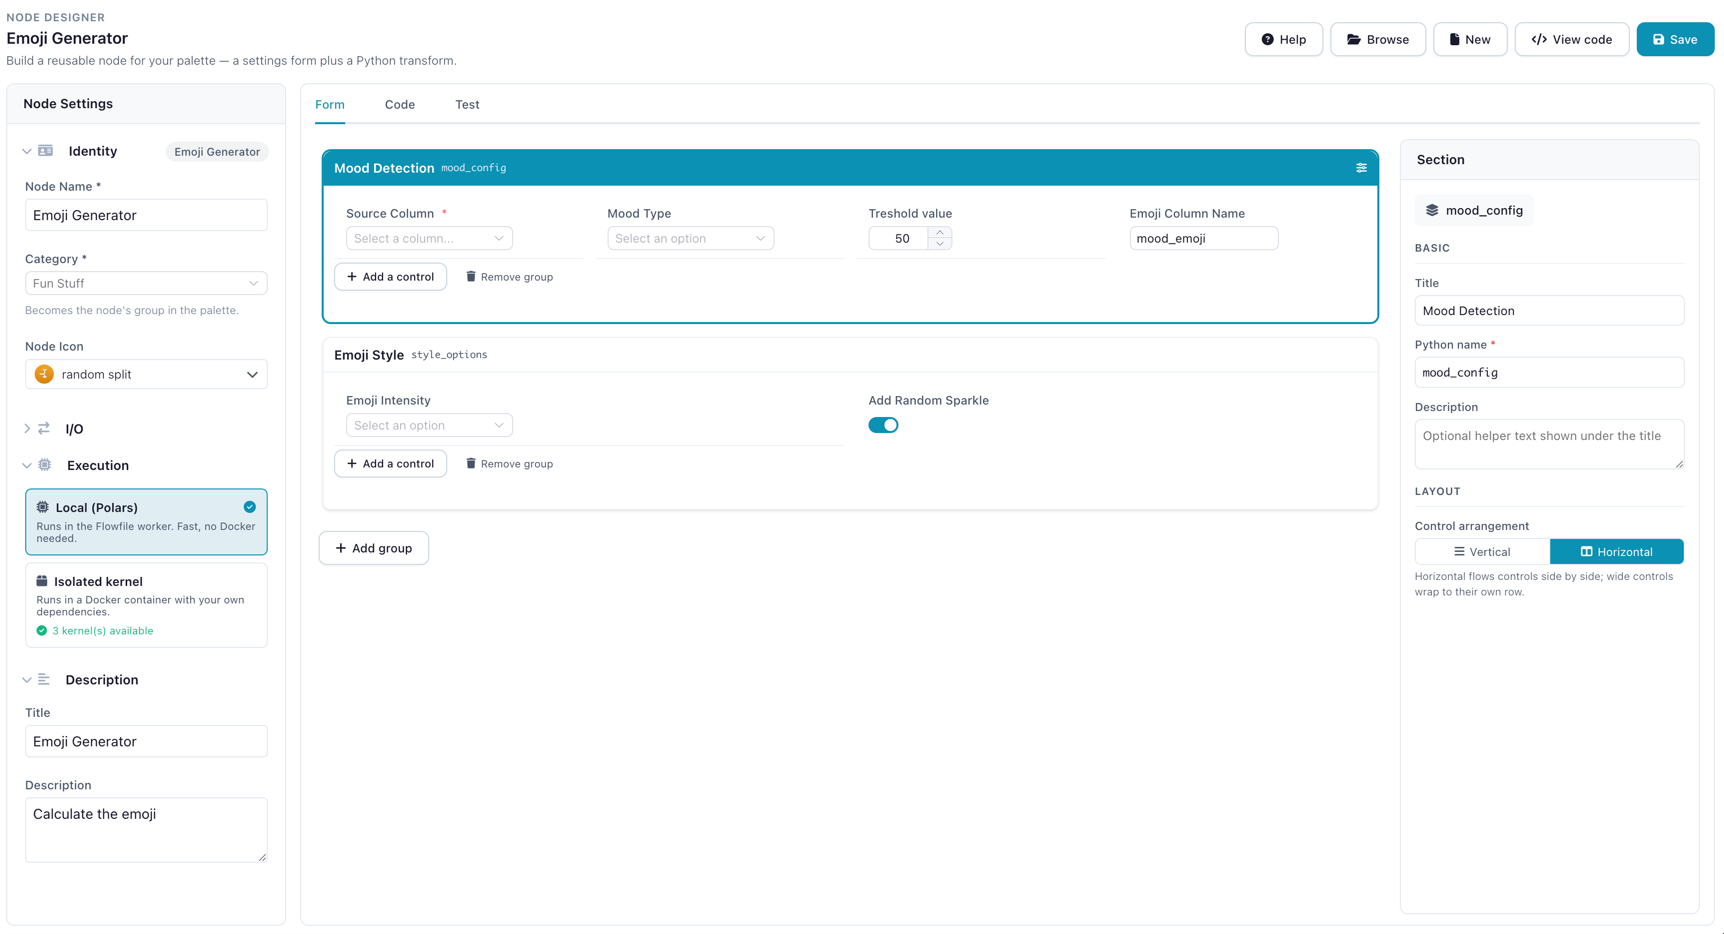
On the Form tab you assemble the settings panel by dragging in controls. Add two groups.
Group one — "Mood Detection" (Python name mood_config). Add four controls:
| Control | Field name | Configure |
|---|---|---|
| Column Selector | source_column |
Data types → Numeric, Required on |
| Single Select | mood_type |
Seven options (performance, temperature, money, energy, love, chaos, pizza) — default performance |
| Numeric Input | threshold_value |
Label "Mood Threshold", default 50, min 0, max 100 |
| Text Input | emoji_column_name |
Label "New Emoji Column Name", default mood_emoji |
Group two — "Emoji Style" (Python name style_options). Add two controls:
| Control | Field name | Configure |
|---|---|---|
| Single Select | emoji_intensity |
Options: subtle, normal, extra, maximum — default normal |
| Toggle Switch | add_random_sparkle |
Label "Add Random Sparkles", default on |
Selecting a control opens the Control Inspector on the right, where you set its label, field name, and type-specific options (the option list for a select, min/max for a number, and so on). The field name you give each control is exactly what you'll read in the code — self.settings_schema.mood_config.source_column.value, and so on.
The two form groups
3. Write the transform
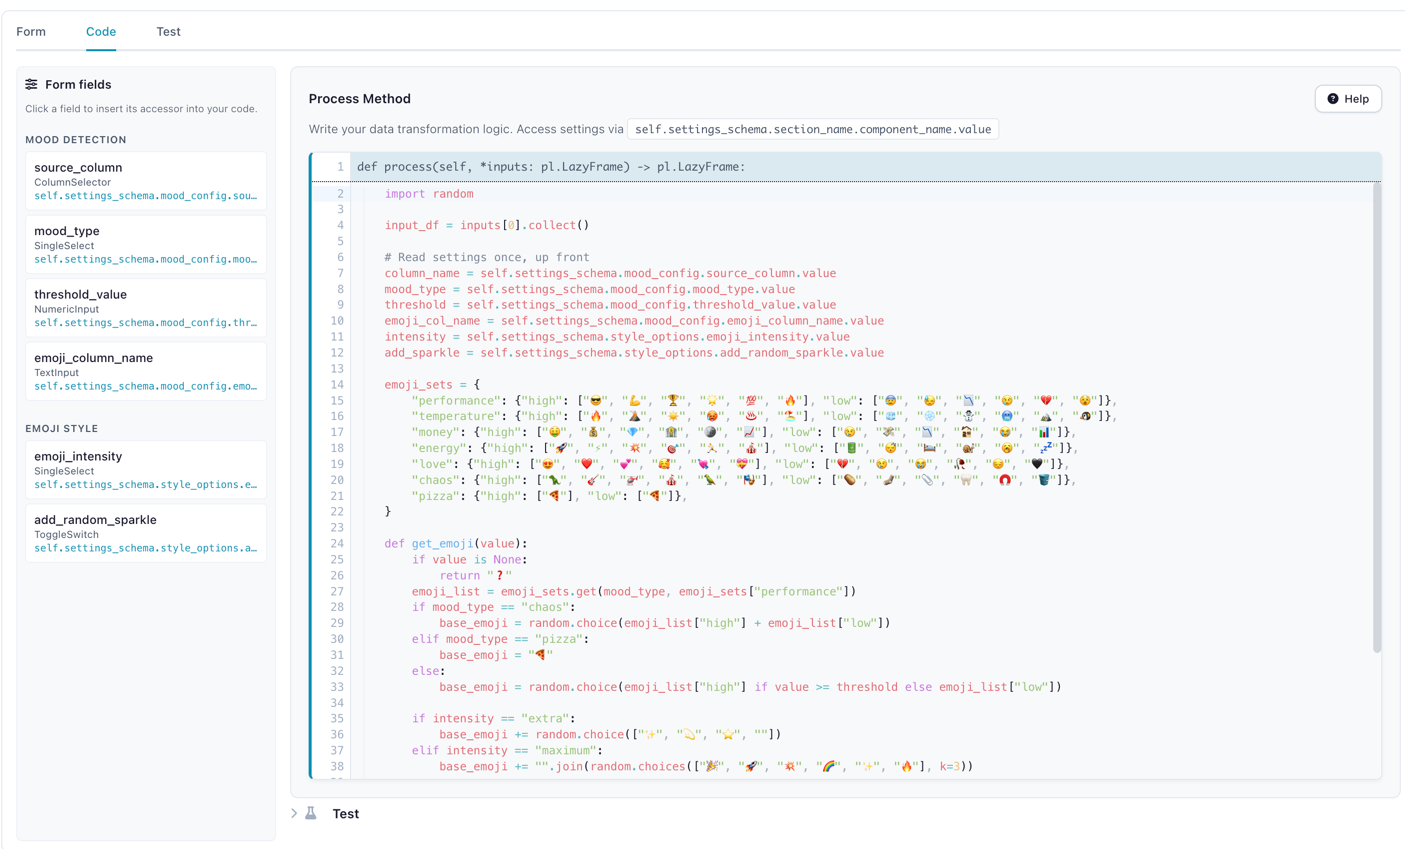
Switch to the Code tab. The signature header is fixed — you write the body only. The Form fields panel lists every control with its accessor path; click one to insert it. This node maps each value to an emoji with a per-row Python callback (map_elements), which is eager, so it collects the input first:
import random

input_df = inputs[0].collect()

# Read settings once, up front
column_name = self.settings_schema.mood_config.source_column.value
mood_type = self.settings_schema.mood_config.mood_type.value
threshold = self.settings_schema.mood_config.threshold_value.value
emoji_col_name = self.settings_schema.mood_config.emoji_column_name.value
intensity = self.settings_schema.style_options.emoji_intensity.value
add_sparkle = self.settings_schema.style_options.add_random_sparkle.value

emoji_sets = {
    "performance": {"high": ["😎", "💪", "🏆", "🌟", "💯", "🔥"], "low": ["😰", "😓", "📉", "😢", "💔", "😵"]},
    "temperature": {"high": ["🔥", "🌋", "☀️", "🥵", "♨️", "🏖️"], "low": ["🧊", "❄️", "⛄", "🥶", "🏔️", "🐧"]},
    "money": {"high": ["🤑", "💰", "💎", "🏦", "🪙", "📈"], "low": ["😢", "💸", "📉", "🏚️", "😭", "📊"]},
    "energy": {"high": ["🚀", "⚡", "💥", "🎯", "🏃", "🎪"], "low": ["🔋", "😴", "🛌", "🐌", "🥱", "💤"]},
    "love": {"high": ["😍", "❤️", "💕", "🥰", "💘", "💝"], "low": ["💔", "😢", "😭", "🥀", "😔", "🖤"]},
    "chaos": {"high": ["🦖", "🎸", "🚁", "🎪", "🦜", "🎭"], "low": ["🥔", "🧦", "📎", "🦷", "🧲", "🪣"]},
    "pizza": {"high": ["🍕"], "low": ["🍕"]},
}

def get_emoji(value):
    if value is None:
        return "❓"
    emoji_list = emoji_sets.get(mood_type, emoji_sets["performance"])
    if mood_type == "chaos":
        base_emoji = random.choice(emoji_list["high"] + emoji_list["low"])
    elif mood_type == "pizza":
        base_emoji = "🍕"
    else:
        base_emoji = random.choice(emoji_list["high"] if value >= threshold else emoji_list["low"])

    if intensity == "extra":
        base_emoji += random.choice(["✨", "💫", "⭐", ""])
    elif intensity == "maximum":
        base_emoji += "".join(random.choices(["🎉", "🚀", "💥", "🌈", "✨", "🔥"], k=3))

    if add_sparkle and random.random() > 0.7:
        base_emoji += "✨"
    return base_emoji

return input_df.with_columns(
    pl.col(column_name)
    .map_elements(get_emoji, return_dtype=pl.String)
    .alias(emoji_col_name)
)
Returning an eager DataFrame is fine — the framework normalizes it.
Performance
map_elements runs a Python callback per row — fine for a demo, slower on large data, and it forces the .collect() at the top. Prefer native Polars expressions when the logic allows, keep the frame lazy when you can, and read settings once up front (not inside the row callback).
The Code tab
4. Test it
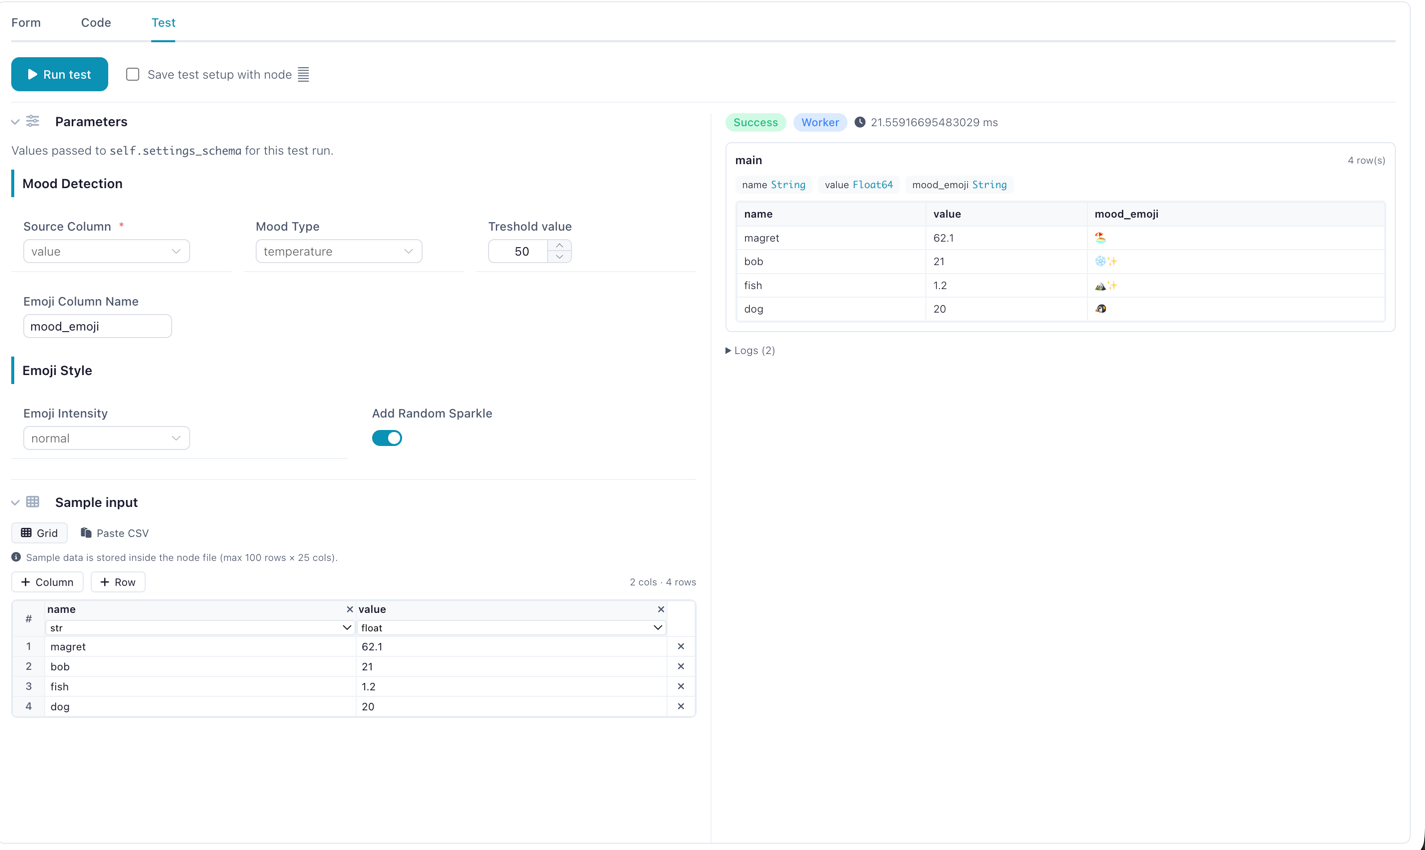
On the Test tab, paste this sample and click Run test — you see the output grid, logs, and any error without touching a flow. The source_column picker filters to numeric columns, so point it at value:
name,value
bob,21
magret,62.1
fish,1.2
dog,20
The mood_emoji column in the result
5. Save and use it
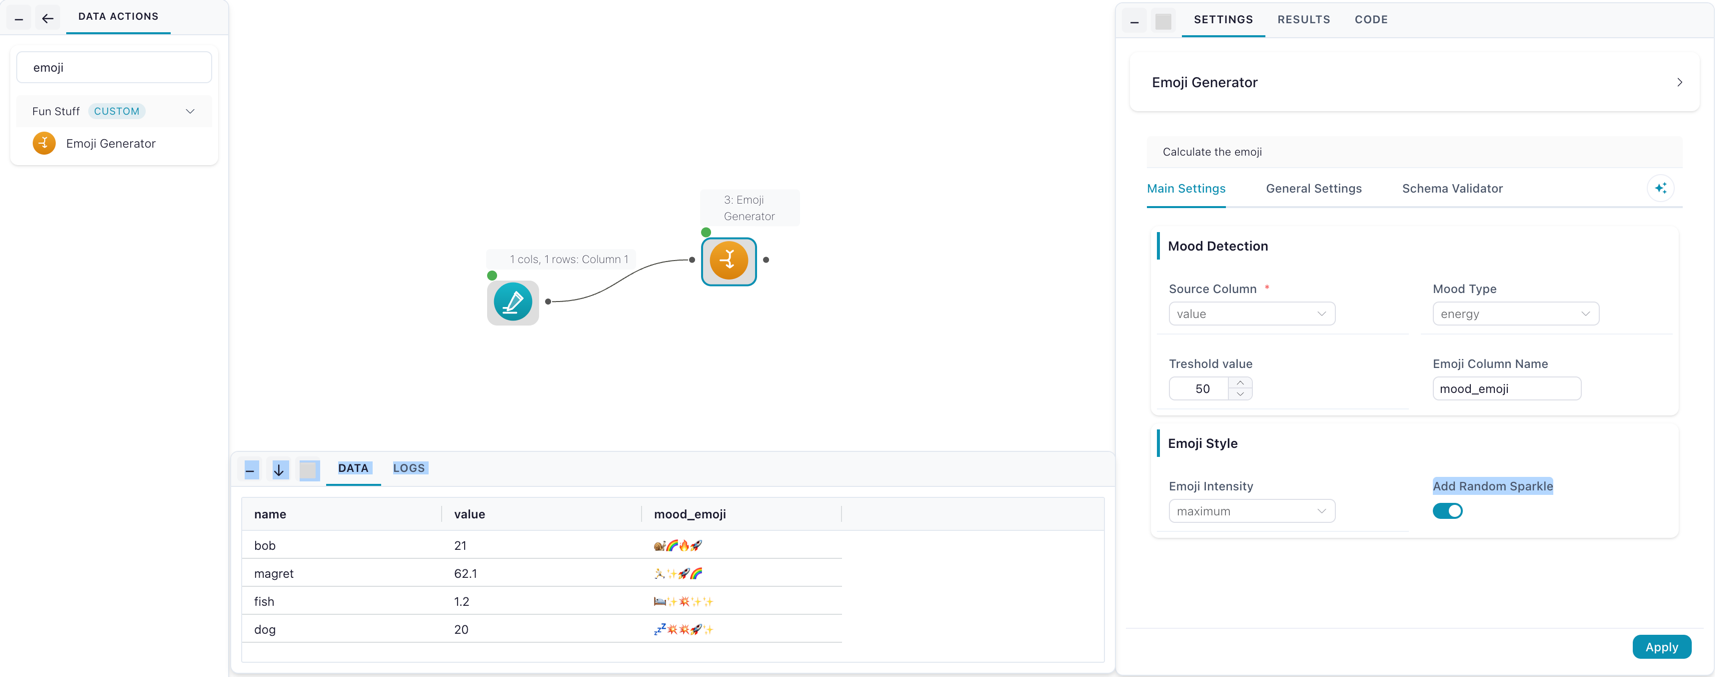
Click Save. The node loads immediately — no restart — under the Fun Stuff group in the palette. Drag it onto the canvas, connect a "Manual Input" (or any numeric source), configure it, and run.
The node in a flow: settings drawer and emoji column
The same node as a file
The designer saved your node to a .py file in ~/.flowfile/user_defined_nodes/. If you'd rather write it directly — to version-control it, or to skip the UI — here is the whole thing. Because it stays within the visual subset, it reopens in the Node Designer: this file and the visual build above are the same node.
import random

import polars as pl

from flowfile import node_designer as nd


class EmojiMoodSection(nd.Section):
    source_column: nd.ColumnSelector = nd.ColumnSelector(
        label="Analyze This Column",
        multiple=False,
        required=True,
        data_types=nd.Types.Numeric,
    )
    mood_type: nd.SingleSelect = nd.SingleSelect(
        label="Emoji Mood Logic",
        options=[
            ("performance", "Performance Based (High = 😎, Low = 😰)"),
            ("temperature", "Temperature (Hot = 🔥, Cold = 🧊)"),
            ("money", "Money Mode (Rich = 🤑, Poor = 😢)"),
            ("energy", "Energy Level (High = 🚀, Low = 🔋)"),
            ("love", "Love Meter (High = 😍, Low = 💔)"),
            ("chaos", "Pure Chaos (Random emojis)"),
            ("pizza", "Pizza Scale (Everything becomes pizza)"),
        ],
        default="performance",
    )
    threshold_value: nd.NumericInput = nd.NumericInput(
        label="Mood Threshold", default=50.0, min_value=0, max_value=100,
    )
    emoji_column_name: nd.TextInput = nd.TextInput(
        label="New Emoji Column Name", default="mood_emoji",
    )


class EmojiStyleSection(nd.Section):
    emoji_intensity: nd.SingleSelect = nd.SingleSelect(
        label="Emoji Intensity",
        options=[
            ("subtle", "Subtle (One emoji)"),
            ("normal", "Normal (1-2 emojis)"),
            ("extra", "Extra (2-3 emojis)"),
            ("maximum", "MAXIMUM OVERDRIVE"),
        ],
        default="normal",
    )
    add_random_sparkle: nd.ToggleSwitch = nd.ToggleSwitch(
        label="Add Random Sparkles", default=True,
        description="Randomly sprinkle a sparkle for extra pizzazz",
    )


class EmojiSettings(nd.NodeSettings):
    mood_config: EmojiMoodSection = EmojiMoodSection(
        title="Mood Detection",
        description="Configure how to detect the vibe of your data",
    )
    style_options: EmojiStyleSection = EmojiStyleSection(
        title="Emoji Style",
        description="Fine-tune your emoji experience",
    )


class EmojiGenerator(nd.CustomNodeBase):
    node_name: str = "Emoji Generator"
    node_category: str = "Fun Stuff"
    title: str = "Emoji Generator"
    intro: str = "Add an emoji column derived from a numeric column."

    settings_schema: EmojiSettings = EmojiSettings()

    def process(self, *inputs: pl.LazyFrame) -> pl.LazyFrame:
        input_df = inputs[0].collect()

        column_name = self.settings_schema.mood_config.source_column.value
        mood_type = self.settings_schema.mood_config.mood_type.value
        threshold = self.settings_schema.mood_config.threshold_value.value
        emoji_col_name = self.settings_schema.mood_config.emoji_column_name.value
        intensity = self.settings_schema.style_options.emoji_intensity.value
        add_sparkle = self.settings_schema.style_options.add_random_sparkle.value

        emoji_sets = {
            "performance": {"high": ["😎", "💪", "🏆", "🌟", "💯", "🔥"], "low": ["😰", "😓", "📉", "😢", "💔", "😵"]},
            "temperature": {"high": ["🔥", "🌋", "☀️", "🥵", "♨️", "🏖️"], "low": ["🧊", "❄️", "⛄", "🥶", "🏔️", "🐧"]},
            "money": {"high": ["🤑", "💰", "💎", "🏦", "🪙", "📈"], "low": ["😢", "💸", "📉", "🏚️", "😭", "📊"]},
            "energy": {"high": ["🚀", "⚡", "💥", "🎯", "🏃", "🎪"], "low": ["🔋", "😴", "🛌", "🐌", "🥱", "💤"]},
            "love": {"high": ["😍", "❤️", "💕", "🥰", "💘", "💝"], "low": ["💔", "😢", "😭", "🥀", "😔", "🖤"]},
            "chaos": {"high": ["🦖", "🎸", "🚁", "🎪", "🦜", "🎭"], "low": ["🥔", "🧦", "📎", "🦷", "🧲", "🪣"]},
            "pizza": {"high": ["🍕"], "low": ["🍕"]},
        }

        def get_emoji(value):
            if value is None:
                return "❓"
            emoji_list = emoji_sets.get(mood_type, emoji_sets["performance"])
            if mood_type == "chaos":
                base_emoji = random.choice(emoji_list["high"] + emoji_list["low"])
            elif mood_type == "pizza":
                base_emoji = "🍕"
            else:
                base_emoji = random.choice(emoji_list["high"] if value >= threshold else emoji_list["low"])

            if intensity == "extra":
                base_emoji += random.choice(["✨", "💫", "⭐", ""])
            elif intensity == "maximum":
                base_emoji += "".join(random.choices(["🎉", "🚀", "💥", "🌈", "✨", "🔥"], k=3))

            if add_sparkle and random.random() > 0.7:
                base_emoji += "✨"
            return base_emoji

        return input_df.with_columns(
            pl.col(column_name)
            .map_elements(get_emoji, return_dtype=pl.String)
            .alias(emoji_col_name)
        )
Save it as ~/.flowfile/user_defined_nodes/emoji_generator.py and it appears in the palette just the same.
Recap
You built a custom node with a two-section settings form, a type-filtered column picker, and a process method that maps values to emojis — start to finish in the Node Designer, with the equivalent file as a drop-in alternative.
Next:
- Custom Nodes in Code — the full component catalog, execution environments, multi-input/multi-output nodes, and the
SecretSelectorfor API-backed nodes. - K-Means on a Kernel — a node that needs a third-party library (scikit-learn), run in an isolated kernel.
- Node Designer — the designer, in depth.