Creating Custom Nodes
Build your own data transformation nodes with custom UI components and processing logic.
Visual Alternative
You can also create custom nodes visually using the Node Designer without writing Python files directly.
Beta Feature
Custom nodes are currently in beta. Some features like changing the icon are still in development.
What Are Custom Nodes?
Custom nodes let you extend Flowfile with your own data transformations that appear as native nodes in the visual editor. Each custom node includes:
- Custom UI - Automatically generated settings panels with dropdowns, inputs, and toggles
- Data Processing - Polars-based transformation logic
- Visual Integration - Appears seamlessly in the node palette
Quick Start
1. Create Your First Node
Create a new Python file in your custom nodes directory:
~/.flowfile/user_defined_nodes/my_first_node.py
Custom Node Location
The ~/.flowfile/user_defined_nodes/ directory is automatically created when you first run Flowfile. Place all your custom nodes here.
Here's a simple example that adds a greeting column:
import polars as pl
from flowfile_core.flowfile.node_designer import (
    CustomNodeBase,
    Section,
    NodeSettings,
    TextInput,
    SingleSelect,
    ColumnSelector,
    Types
)

class GreetingSettings(NodeSettings):
    main_config: Section = Section(
        title="Greeting Configuration",
        description="Configure how to greet your data",
        name_column=ColumnSelector(
            label="Name Column",
            data_types=Types.String,
            required=True
        ),
        greeting_style=SingleSelect(
            label="Greeting Style",
            options=[
                ("formal", "Formal (Hello, Mr/Ms)"),
                ("casual", "Casual (Hey there!)"),
                ("enthusiastic", "Enthusiastic (OMG HI!!!)"),
            ],
            default="casual"
        ),
        custom_message=TextInput(
            label="Custom Message",
            default="Nice to meet you!",
            placeholder="Enter your custom greeting..."
        )
    )

class GreetingNode(CustomNodeBase):
    node_name: str = "Greeting Generator"
    node_category: str = "Text Processing"
    title: str = "Add Personal Greetings"
    intro: str = "Transform names into personalized greetings"

    settings_schema: GreetingSettings = GreetingSettings()

    def process(self, input_df: pl.LazyFrame) -> pl.LazyFrame:
        # Get values from the UI
        name_col = self.settings_schema.main_config.name_column.value
        style = self.settings_schema.main_config.greeting_style.value
        custom = self.settings_schema.main_config.custom_message.value

        # Define greeting logic
        if style == "formal":
            greeting_expr = pl.concat_str([
                pl.lit("Hello, "),
                pl.col(name_col),
                pl.lit(f". {custom}")
            ])
        elif style == "casual":
            greeting_expr = pl.concat_str([
                pl.lit("Hey "),
                pl.col(name_col),
                pl.lit(f"! {custom}")
            ])
        else:  # enthusiastic
            greeting_expr = pl.concat_str([
                pl.lit("OMG HI "),
                pl.col(name_col).str.to_uppercase(),
                pl.lit(f"!!! {custom} 🎉")
            ])

        return input_df.with_columns([
            greeting_expr.alias("greeting")
        ])
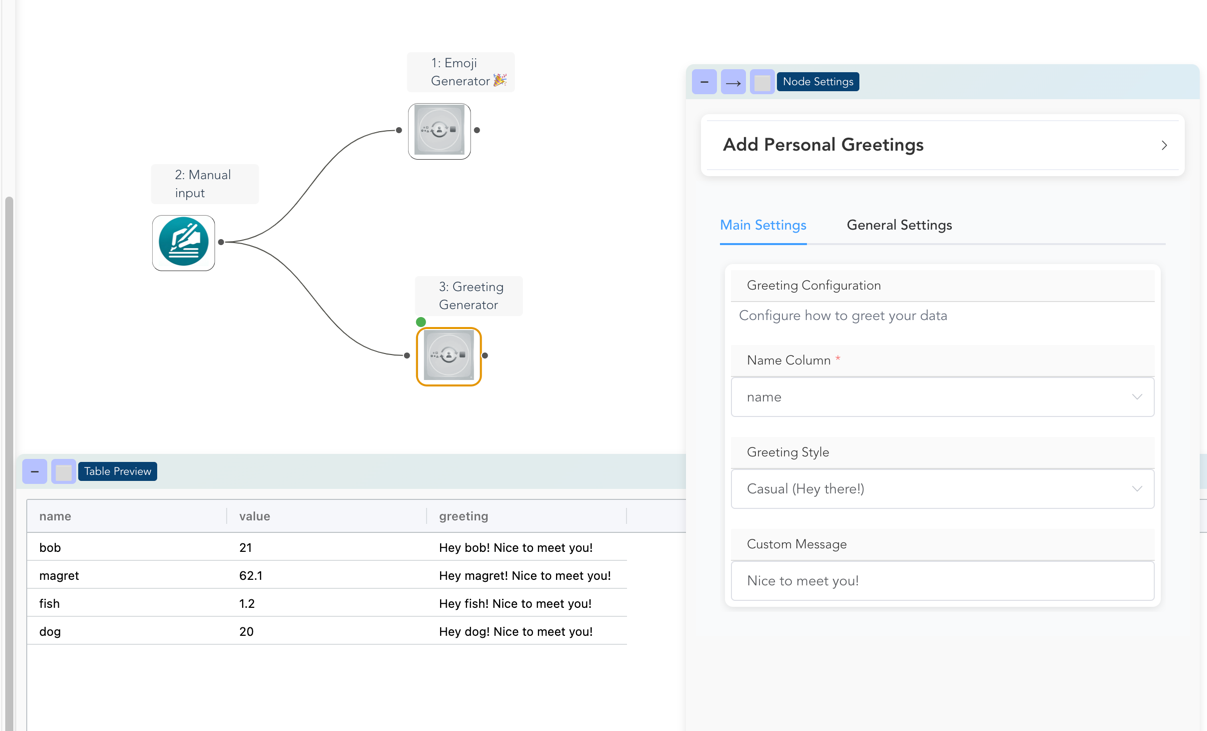
2. Use Your Node
- Restart Flowfile to load your new node
- Open the visual editor
- Find your node in the "Text Processing" category
- Drag it onto the canvas
- Configure the settings in the right panel
- Run your flow and see the results!
Visual overview of the result!
Understanding the Architecture
Node Structure
Every custom node has three main parts:
class MyCustomNode(CustomNodeBase):
    # 1. Metadata - How the node appears in Flowfile
    node_name: str = "My Amazing Node"
    node_category: str = "Data Enhancement"
    title: str = "Add Personal Greetings"
    intro: str = "Transform names into personalized greetings"

    # 2. Settings Schema - The UI configuration
    settings_schema: MySettings = MySettings()

    # 3. Processing Logic - What the node actually does
    def process(self, input_df: pl.LazyFrame) -> pl.LazyFrame:
        # Your transformation logic here
        return modified_df
3. Process
Only one input supported for now
Currently, custom nodes only support a single input DataFrame. Support for multiple inputs is planned for future releases.
The process method is the engine of your node. This is where you write your Polars code to transform the data.
-
Input: The method receives the incoming data as a Polars LazyFrame. If your node has multiple inputs, they will be passed as separate arguments (e.g., process(self, df1)).
-
Accessing Settings: Inside this method, you can get the current values from your UI components using self.settings_schema.
. .value. -
Output: The method must return a single Polars LazyFrame, which becomes the output of your node.
Settings Architecture
Settings are organized in sections for clean UI organization:
class MyNodeSettings(NodeSettings):
    # Each section becomes a collapsible panel in the UI
    basic_config: Section = Section(
        title="Basic Settings",
        description="Core functionality options",
        # Components go here as keyword arguments
        input_column=ColumnSelector(...),
        operation_type=SingleSelect(...)
    )

    advanced_options: Section = Section(
        title="Advanced Options",
        description="Fine-tune behavior",
        enable_caching=ToggleSwitch(...),
        max_iterations=NumericInput(...)
    )
Available UI Components
Text Input
For capturing string values:
text_field = TextInput(
    label="Enter a value",
    default="Default text",
    placeholder="Hint text here..."
)
Numeric Input
For numbers with optional validation:
number_field = NumericInput(
    label="Count",
    default=10,
    min_value=1,
    max_value=100
)
Single Select
Dropdown for one choice:
choice_field = SingleSelect(
    label="Choose option",
    options=[
        ("value1", "Display Name 1"),
        ("value2", "Display Name 2"),
        ("simple", "Simple String Option")
    ],
    default="value1"
)
Multi Select
For selecting multiple options:
multi_field = MultiSelect(
    label="Select multiple",
    options=[
        ("opt1", "Option 1"),
        ("opt2", "Option 2"),
        ("opt3", "Option 3")
    ],
    default=["opt1", "opt2"]
)
Toggle Switch
Boolean on/off control:
toggle_field = ToggleSwitch(
    label="Enable feature",
    default=True,
    description="Turn this on to enable the feature"
)
Column Selector
Smart column picker with type filtering:
# Select any column
any_column = ColumnSelector(
    label="Pick a column",
    data_types=Types.All
)

# Select only numeric columns
numeric_column = ColumnSelector(
    label="Numeric column only",
    data_types=Types.Numeric,
    required=True
)

# Select multiple string columns
text_columns = ColumnSelector(
    label="Text columns",
    data_types=[Types.String, Types.Categorical],
    multiple=True
)
Secret Selector
Access stored secrets (API keys, credentials, tokens) securely:
from flowfile_core.flowfile.node_designer import SecretSelector

class MyNode(CustomNodeBase):
    settings_schema = NodeSettings(
        components=[
            SecretSelector(name="api_key", label="API Key"),
        ]
    )
The SecretSelector displays a dropdown of available secrets configured by the user. Secrets are stored securely and retrieved at runtime. This is useful for nodes that connect to external APIs or services.
Dynamic Column Options
Use IncomingColumns for dropdowns that populate with input columns:
column_dropdown = SingleSelect(
    label="Choose input column",
    options=IncomingColumns  # Automatically filled with column names
)
Type Filtering in Column Selector
The Types object provides convenient type filtering:
from flowfile_core.flowfile.node_designer import Types

# Type groups
Types.Numeric    # All numeric types
Types.String     # String and categorical
Types.Date       # Date, datetime, time
Types.Boolean    # Boolean columns
Types.All        # All column types

# Specific types
Types.Int64      # 64-bit integers
Types.Float      # Float64
Types.Decimal    # Decimal types

# Mix and match
data_types=[Types.Numeric, Types.Date]  # Numbers and dates only
Real-World Examples
Data Quality Node
class DataQualityNode(CustomNodeBase):
    node_name: str = "Data Quality Checker"
    node_category: str = "Data Validation"

    settings_schema: DataQualitySettings = DataQualitySettings(
        validation_rules=Section(
            title="Validation Rules",
            columns_to_check=ColumnSelector(
                label="Columns to Validate",
                data_types=Types.All,
                multiple=True
            ),
            null_threshold=NumericInput(
                label="Max Null Percentage",
                default=5.0,
                min_value=0,
                max_value=100
            ),
            add_summary=ToggleSwitch(
                label="Add Quality Summary",
                default=True
            )
        )
    )

    def process(self, input_df: pl.LazyFrame) -> pl.LazyFrame:
        columns = self.settings_schema.validation_rules.columns_to_check.value
        threshold = self.settings_schema.validation_rules.null_threshold.value

        # Calculate quality metrics
        quality_checks = []
        for col in columns:
            null_pct = (input_df[col].is_null().sum() / len(input_df)) * 100
            quality_checks.append({
                "column": col,
                "null_percentage": null_pct,
                "quality_flag": "PASS" if null_pct <= threshold else "FAIL"
            })

        # Add quality flags to original data
        result_df = input_df
        for check in quality_checks:
            if check["quality_flag"] == "FAIL":
                result_df = result_df.with_columns([
                    pl.col(check["column"]).is_null().alias(f"{check['column']}_has_issues")
                ])

        return result_df
Text Processing Node
class TextCleanerNode(CustomNodeBase):
    node_name: str = "Text Cleaner"
    node_category: str = "Text Processing"

    settings_schema: TextCleanerSettings = TextCleanerSettings(
        cleaning_options=Section(
            title="Cleaning Options",
            text_column=ColumnSelector(
                label="Text Column",
                data_types=Types.String,
                required=True
            ),
            operations=MultiSelect(
                label="Cleaning Operations",
                options=[
                    ("lowercase", "Convert to lowercase"),
                    ("remove_punctuation", "Remove punctuation"),
                    ("remove_extra_spaces", "Remove extra spaces"),
                    ("remove_numbers", "Remove numbers"),
                    ("trim", "Trim whitespace")
                ],
                default=["lowercase", "trim"]
            ),
            output_column=TextInput(
                label="Output Column Name",
                default="cleaned_text"
            )
        )
    )

    def process(self, input_df: pl.LazyFrame) -> pl.LazyFrame:
        text_col = self.settings_schema.cleaning_options.text_column.value
        operations = self.settings_schema.cleaning_options.operations.value
        output_col = self.settings_schema.cleaning_options.output_column.value

        # Start with original text
        expr = pl.col(text_col)

        # Apply selected operations
        if "lowercase" in operations:
            expr = expr.str.to_lowercase()
        if "remove_punctuation" in operations:
            expr = expr.str.replace_all(r"[^\w\s]", "")
        if "remove_extra_spaces" in operations:
            expr = expr.str.replace_all(r"\s+", " ")
        if "remove_numbers" in operations:
            expr = expr.str.replace_all(r"\d+", "")
        if "trim" in operations:
            expr = expr.str.strip_chars()

        return input_df.with_columns([expr.alias(output_col)])
Best Practices
1. Performance
Try to use Polars expressions and lazy evaluation to keep your nodes efficient. A collect will be executed in the core process and can cause issues when using remote compute.
Troubleshooting
Node Doesn't Appear
- Check the file is in
~/.flowfile/user_defined_nodes/ - Restart Flowfile completely
- Check for Python syntax errors in terminal
- Ensure your class inherits from
CustomNodeBase
Settings Don't Work
- Verify
settings_schemais properly assigned - Check component imports
- Ensure section structure is correct
- Use
.valueto access component values inprocess()
Processing Errors
- Check input DataFrame exists and has expected columns
- Use
print()or logging for debugging - Handle null values and edge cases
- Ensure return type is
pl.LazyFrame
Coming Soon
The following features are planned for future releases:
- Node Templates - Quick-start templates for common patterns
- Custom Icons - Upload custom icons for your nodes
- Node Categories - Create your own node categories
- Testing Framework - Built-in testing for custom nodes
- Node Publishing - Share nodes with the community
Ready to build? Start with the Custom Node Tutorial for a step-by-step walkthrough!